WARNING – The content contained in this article no longer works per Bitnami’s deprecation of modules – their announcement is here if you want to find out more.
I found it tedious trying to change all of my websites (6 in total) to Amazon’s Lightsail Bitnami WordPress box. There are many instructions on how to do this using the WordPress Multisite feature, but not if you actually need individual WordPress installations on the same box.
Anyway, after destroying a couple of boxes because of incorrect configurations, I was finally able to develop a process to get myself going and here is that process.
(I’ve assumed from the start you’ve been able to start up an AWS Lightsail Bitnami instance and have successfully SSH’d into it)
Step 1: Download WordPress & Bitnami’s WordPress Module Installer
From inside your shell, download the files needed.
Download a Bitnami WordPress module on your server’s instance:
$ sudo wget https://bitnami.com/redirect/to/1135599/bitnami-wordpress-5.5.3-0-module-linux-x64-installer.run
Step 2: Run Bitnami WordPress Module
We’ll first start with Bitnami doing its thing in setting up a new WordPress installation alongside the default wordpress one in the ~/apps directory.
Next, make the newly downloaded file executable:
$ sudo chmod +x bitnami-wordpress-5.5.3-0-module-linux-x64-installer.run
But before you execute the file, fetch the MySQL password:
$ cat bitnami_application_password
The resulting output will need to be copied and pasted somewhere for use later.
Then execute the Bitnami module, changing the name NEW_WORDPRESS_FOLDER_NAME to a more succinct name for your new WordPress installation.
$ sudo ./bitnami-wordpress-5.5.3-0-module-linux-x64-installer.run --wordpress_instance_name NEW_WORDPRESS_FOLDER_NAME
For example, if I was creating a website called scripteverything.com maybe I’d like to call the directory where everything will reside <strong>se</strong>, therefore my command would look like this:
$ sudo ./bitnami-wordpress-5.5.3-0-module-linux-x64-installer.run --wordpress_instance_name <strong>se</strong>
Follow through the prompts providing the necessary answers. Here were some of my responses:
- Location of Bitnami stack:
/opt/bitnami - If prompted for an admin username, create one (perhaps use your first and last name as the admin user).
- Paste in the MySQL password from step 2 when prompted.
- Give your blog a name:
Script everything - You could enable mail support, but I didn’t.
- Then when you’re almost done it will ask if you’d like to launch the Bitnami stack:
Y
4. When the module has finished installing you will want to add your domain to the newly installed directory, this will require the following command:
$ sudo ~/apps/YOUR_NEW_WORDPRESS_FOLDER/bnconfig --appdomain YOUR_DOMAIN_NAME
For example, if I were to continue with the same example previously of using this very domain, scripteverything.com then I would be running the following:
$ sudo ~/apps/se/bnconfig --appdomain scripteverything.com
This shouldn’t take as long as the first command, but a little patience is required. You could also modify the previous command by running the following if you wanted to disable the Bitnami banner:
$ sudo ~/apps/se/bnconfig --appdomain scripteverything.com --disable_banner 1
If you didn’t run the above you can do it as its own standalone command to remove the Bitnami banner just run the following:
$ sudo ~/apps/YOUR_WORDPRESS_FOLDER/bnconfig --disable_banner 1
Step 3: Create SSL Certificate
Using Cloudflare Free SSL
If you use Cloudflare as your DNS provider, then an easy and free way to get going is to use their SSL service. Simply login to Cloudflare, click on your domain then on the SSL/TLS tile.
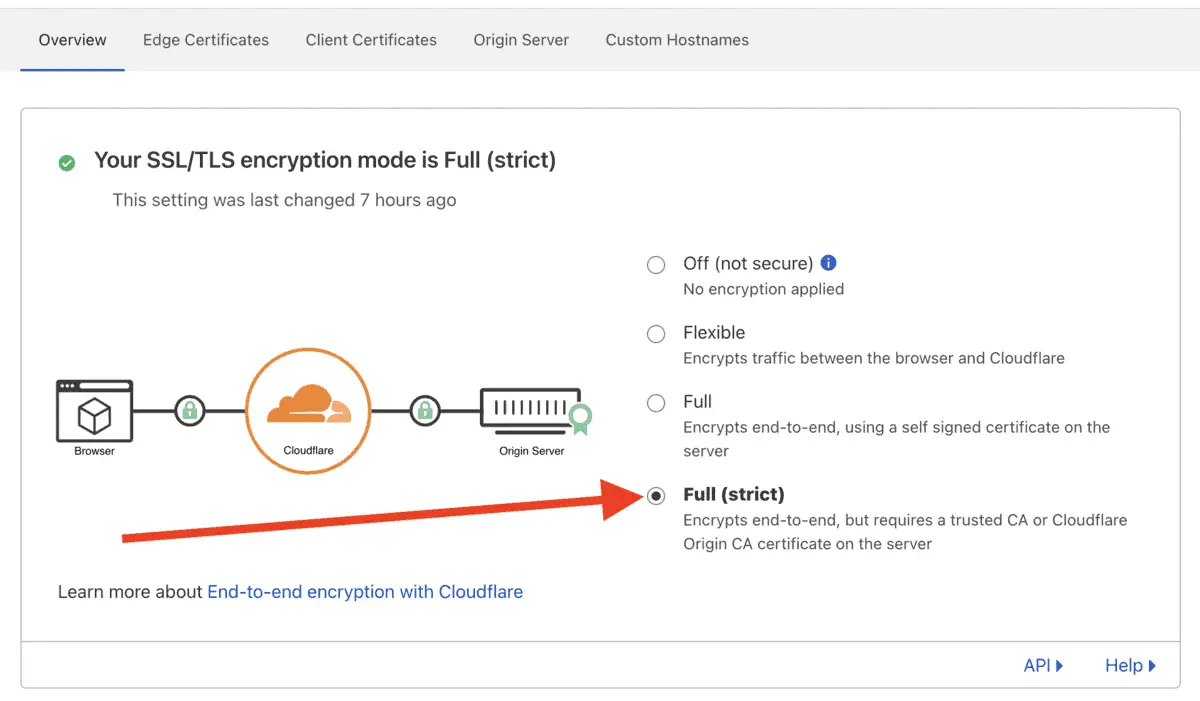
Set the option on the Overview page in SSL/TLS to Full (strict)
Within this area set the mode to Full (Strict), then click on the sub-tab labelled Origin Server and then click on the button labelled Create Certificate.
I’ve left everything as default, so Generate private key and CSR with Cloudflare is selected, I’ve left the domains as listed, and left the Certificate validity option as 15 years.
When you click on the Create button you will be presented with two hashes:
1. One representing an Origin Certificate (in PEM format); and
2. A Private KEY.
Go back to your server and navigate within your app to the ~/apps/YOUR_WORDPRESS_FOLDER/conf/certs folder:
$ cd ~/apps/YOUR_WORDPRESS_DIRECTORY/conf/certs
Then create your first server.pem file:
$ vi server.pem
You may need to change the owner of the newly created server.pem file. Check the file’s ownership by running the list all command of the contents in the conf directory, to see if the server.pem file can be accessed by the bitnami user, if it shows something like this:
$ ls -al
-rw-r--r--- 1 root    root    1672 Apr 10 06:45 server.pem
You will need to enable ownership of the bitnami user change ownership as follows:
$ sudo chown bitnami:bitnami server.pem
So that it looks something like this:
$ ls -al
-rw-r--r--- 1 bitnami bitnami 1672 Apr 10 06:45 server.pem
Copy and paste the first hash in Cloudflare into the editor. You should see the entire contents of the hash on the screen. When you’re happy it’s all there close and save the file. Then do the same for the key:
$ vi server.key
Copy and paste the second hash from Cloudflare into the VIM editor on screen. When you’re happy you’ve copied everything across save and close the file.
As you don’t want to make the KEY file accessible to the outside world you will need to change its permissions. Run the following to make the following permission changes to the server.key file:
$ sudo chmod 0400 server.key
Lastly, you need to check your virtual hosts configuration file to point it to the correct files.
$ sudo vi ~/apps/YOUR_WORDPRESS_DIRECTORY/conf/httpd-vhosts.conf
In this file you want to check the lines that start with:
Generally I’ve found I’ve only needed to edit the SSLCertificateFile line as the file the Apache config looks for ends in crt whereas the file you have added according to my directions above ends with pem.
Amend the SSLCertificateFile line to read:
Step 4: Modify wp-config.php
The last thing you might want to modify is the wp-config.php file to be https by default. Simply edit your file and find the line that defines the SITE and append to the http portion to make it https:
$ sudo vi ~/apps/YOUR_WORDPRESS_DIRETORY/htdocs/wp-config.php
Find in this file the following lines:
define('WP_SITEURL', 'http://' . $_SERVER['HTTP_HOST'] . '/');
define('WP_HOME', 'http://' . $_SERVER['HTTP_HOST'] . '/');
And then modify them to what I have done below:
define('WP_SITEURL', 'http<strong>s</strong>://' . $_SERVER['HTTP_HOST'] . '/');
define('WP_HOME', 'http<strong>s</strong>://' . $_SERVER['HTTP_HOST'] . '/');
(I hope you can see the added s after http in the new code!)
Now that you’ve finished, just reset reset your configurations:
$ sudo /opt/bitnami/ctlscript.sh restart apache
If you happen to get any errors check you’ve done everything correct as outlined above. One letter can make all the difference with changing configurations.
By navigating to your website’s https domain you should see a Hello World WordPress theme up. Congratulations, you can now log in with your password (see the bitnami_application_password at step 1 above).
What If You Don’t Use Cloudflare And Want An SSL Certificate?
If you don’t use Cloudflare there is another free option available to get SSL on your website. It does require a few more little steps, but thankfully the Bitnami stack has helped to automate and help the process along.
Here’s what you would need to do:
Below is the old method not using Cloudflare, kept here for posterity:
Modify httpd-vhosts.conf File
Before running this step you need to comment out the references to the SSL certificates in the httpd-vhosts.conf file. Open this file up and edit:
$ vi ~/apps/YOUR_WORDPRESS_DIRECTORY/conf/httpd-vhosts.conf
The lines you will want to comment out for now will be the following:
Where WP\_DIR is YOUR\_WORDPRESS\_DIRECTORY and \# represents the commenting out of those lines. Save and close the file.
Check DNS Records
One final check before you progress is to ensure that your DNS points to the IP address of your server. You will want the A-record of your domain to point to your IP address and the www CNAME of your website to either similarly point to your IP address or to be redirected to root.
Run Let’s Encrypt
Next you’ll need to run the bncert-tool to create an SSL certificate for our new domain:
$ sudo /opt/bitnami/bncert-tool
Here you’ll progress through another series of prompts about the domain you want to register. Read each prompt carefully.
Here were the prompts and my corresponding responses for registering this domain:
| Bitnami HTTPS Configuration Tool – Prompt | My Response |
|---|---|
Please provide a valid space-separated list of domains for which you wish to configure your web server. Domain list \[\]: | scripteverything.com |
The following domains were not included: www.scripteverything.com. Do you want to add them? \[Y/n\]: | Y |
Enable/disable redirections Please select the redirections you wish to enable or disable on your Bitnami installation. Enable HTTP to HTTPS redirection \[Y/n\]: Enable non-www to www redirection \[Y/n\]: | n Y |
Changes to perform The following changes will be performed to your Bitnami installation: Stop web server Configure web server to use a free Let's Encrypt certificate for the domains: scripteverything.com www.scripteverything.com Configure a cron job to automatically renew the certificate each month Configure web server name to: scripteverything.com Enable HTTP to HTTPS redirection (example: redirect http://scripteverything.com to https://scripteverything.com) Enable www to non-www redirection (example: redirect www.scripteverything.com to scripteverything.com) Start web server once all changes have been performed Do you agree to these changes? \[Y/n\]: | Y |
Create a free HTTPS certificate with Let's Encrypt Please provide a valid e-mail address for which to associate your Let's Encrypt certificate. Domain list: scripteverything.com www.scripteverything.com Server name: scripteverything.com E-mail address \[\]: | I entered my email address |
The Let's Encrypt Subscriber Agreement can be found at: https://letsencrypt.org/documents/LE-SA-v1.2-November-15-2017.pdf Do you agree to the Let's Encrypt Subscriber Agreement? \[Y/n\]: | Y |
Configuring my SSL certificates for this domain
You may get an error at the end of the process stating that your web server failed to start. Go back to your httpd-vhosts.conf file and change the commented lines to point to the newly created certificates.
You can check the certificates have been created by navigating here first:
$ cd /opt/bitnami/apache2/conf
Then check the list of files in this folder and you should see:
$ ls
scripteverything.com.crt   scripteverything.com.key
This location is now what you need to replace into your httpd-vhosts.conf file.
Once you have successfully created the certificates, you’ll need to modify your app’s Apache configuration to point to these new files:
$ sudo vi ~/apps/YOUR_WORDPRESS_DIRECTORY/conf
Here you’ll see a listing of the files in the conf directory, using your arrow keys on the keyboard navigate down to the httpd-vhosts.conf file and hit Enter to open this file up in Vim.
You will need to edit the following lines in the file to point to your newly created SSL files, here are the two lines you need to change, they start with SSLCertificateFile and SSLCertificateKeyFile:
You need to point these files to where the files are located in the apache2/conf folder.
Close the file by saving your edits – in Vim to edit you need to hit the i key, then when you’ve finished editing hit the Escape key and to save your edits enter :wq
To finally check that everything is working fine you need to restart:
$ sudo /opt/bitnami/ctlscript.sh restart apache
You should then see something like this if everything is okay:
Unmonitored apache
Syntax OK
/opt/bitnami/apache2/scripts/ctl.sh : httpd stopped
Syntax OK
/opt/bitnami/apache2/scripts/ctl.sh : httpd started at port 80
Monitored apache
You can then navigate to your URL and you should see a blank WordPress installation!
To login in use your admin username you created above, and use the password you provided, or the MySQL password.
How To Uninstall A Bitnami Module
If you find you’ve incorrectly installed a Bitnami module and want it removed from your apps folder simply navigate to the apps folder where you should see a list of all the modules after running the ls command, like so:
~/apps$ ls
bitnami   phpmyadmin   se   wordpress
To remove the wordpress module from this stack simply run this command from within the apps folder:
~/apps$ sudo wordpress/uninstall
You will be prompted with the following after entering that command:
Do you want to uninstall Bitnami WordPress Module and all of its modules? [Y/n]:
Followed by whether you want to remove the database:
Do you want to keep the wordpress database? It will be saved at /opt/bitnami/backups [Y/n]:
After these questions have been answered the Bitnami module you’ve wanted to remove should be gone, and you can confirm this by running the ls command again, and as you can see below the wordpress module has now been removed:
~/apps$ ls
bitnami   phpmyadmin   se
Summary
In this article you discovered how to add another WordPress installation to our Bitnami WordPress box, without using the Multisite instance.
You can install as many instances as you wish, and if you ever want to remove an installation simply run the following command:
$ sudo ~/apps/WORDPRESS_FOLDER_NAME/uninstall
This will completely remove all the files in that folder, and when prompted even the data in the MySQL database if desired.