I was once connecting my Dropbox account to a Windows VPS to try and sync files from the server to my computer. While I ran into a few problems initially with probably the biggest problem being NOT selecting which folders TO sync and as a result I fried a few Windows boxes.
And the software doing the pushing needs to be lightweight.
Store your images on Amazon’s S3
It is relatively cheap to store your photos on Amazon S3 with each GB costing around 2.5 cents! That’s correct, a whopping 2.5 cents to store all your files per gigabyte.
Here’s what you need to do to get set up:
Create S3 Bucket
This is the easiest part. Simply create go to Amazon AWS and create an account.
Then click on Services and then on S3.
Take note of the short-name of the s3 region where the bucket has been created (eg. ap-southeast-2 for Sydney).
Create IAM User
To interact with the S3 bucket from your Windows machine, create a specific user which will be granted the privileges to interact with your newly created S3 bucket.
Grant permission to the IAM user for it to be able to write to S3 buckets.
Copy the Access Key ID and Access Secret ID.
Install AWS CLI in Windows VPS
Log in to your windows VPS and download the AWS CLI to your Windows VPS.
Install the Windows MSI installer and follow through the prompts.
Once you have finished installing the AWS command-line tool, open Windows Run and enter cmd – this will open the Command Prompt.
Run aws configure and you will be prompted with some instructions on data to insert, namely:
- Access Key – from step
3B - Access Secret – from step
3B - Short name of the bucket’s location – from step
2A(ap-southeast-2for my Sydney bucket) - Output type – leave as
json(unless you want some other format).
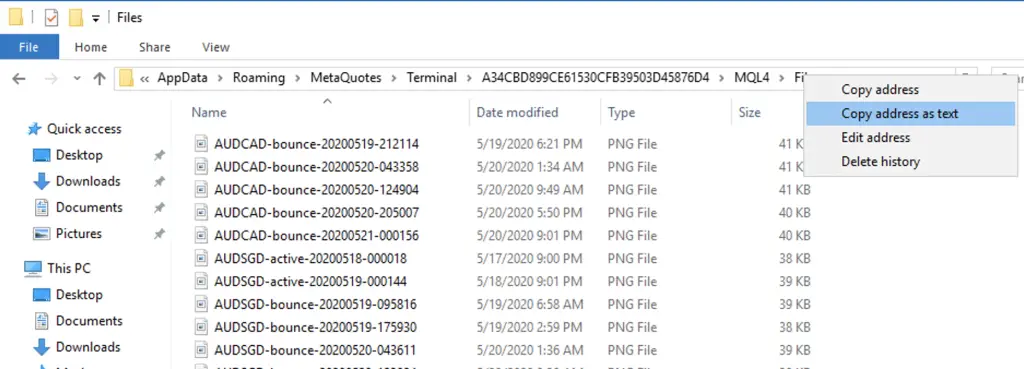
In Windows Explorer navigate to the location of your forex images. I found mine located in the folder like this:
Copy this long path string as text. I found right-clicking on the address bar in Windows Explorer and select Copy address as text.
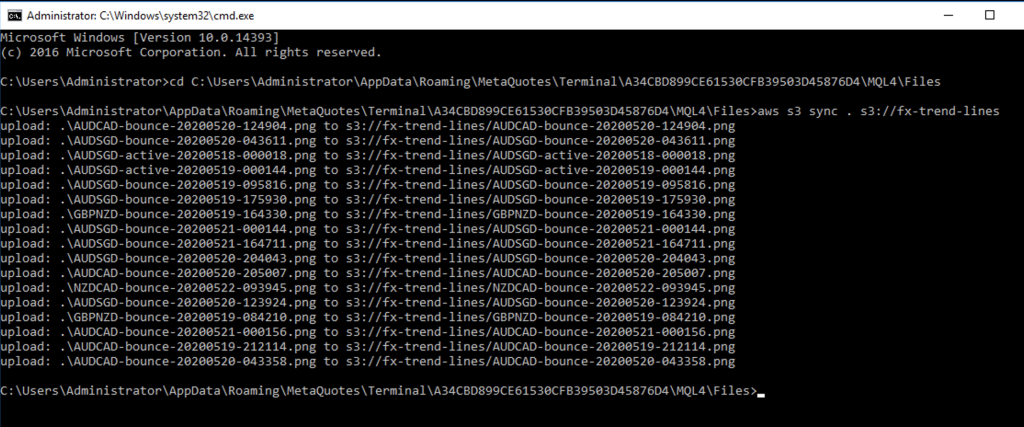
Return to the Command Prompt and change directory to where the MetaTrader images have been stored:
Once the current directory has been changed run the AWS S3 SYNC command:
The . in the command above denotes the current directory and the s3:// address is the bucket you’ve created.
If everything has been configured correctly then you should see your files uploaded to s3 which would look like this:
Create Batch File
The final step to begin the automation of processing the S3 sync automatically is to create a batch file which you can schedule to run on an automated schedule.
Create a file on your desktop using Notepad with the following code:
cd C:/Users/Administrator/Files
aws s3 sync . s3://your-bucket-name
Save the file somewhere meaningful, perhaps the Desktop and with an appropriate name.
You can test to see if this batch file works by double clicking on it in Windows. If you see the files in your new S3 bucket you’ve done well and can proceed to running the script based on a Task Schedule.
If however you’re having problems with the batch file doing anything see below for further ways you can diagnose issues.
Create Task Schedule
Open up the Task Scheduler. If you’re comfortable creating a scheduled task using the command line, you can replace step 9 with the command line schtasks below, but you will still need to customise the settings.
From the UI, click Create Basic Task. On the window screen prompting you for when you want the task to start, set this to One time. Select the precise time during the day (if you selected daily). Select the action Start a program, then select the batch file created above.
On the final step, tick the box Open the Properties dialog for this task when I click Finish, then click Finish.
We need to apply some further edits to our basic task to make it recur.
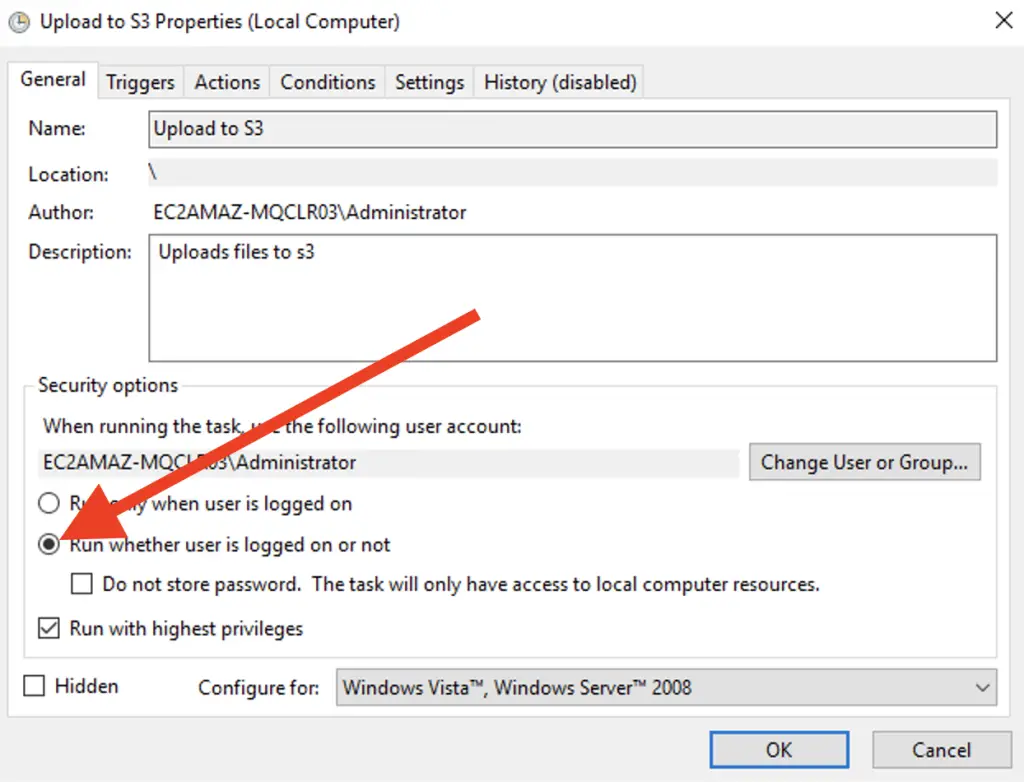
On the Properties window you can write a more detailed description to help jog your memory on what the purpose of this task will be doing. In the Security Options section select the option to run the script without being logged in. While here, check the box to Run with highest privileges.
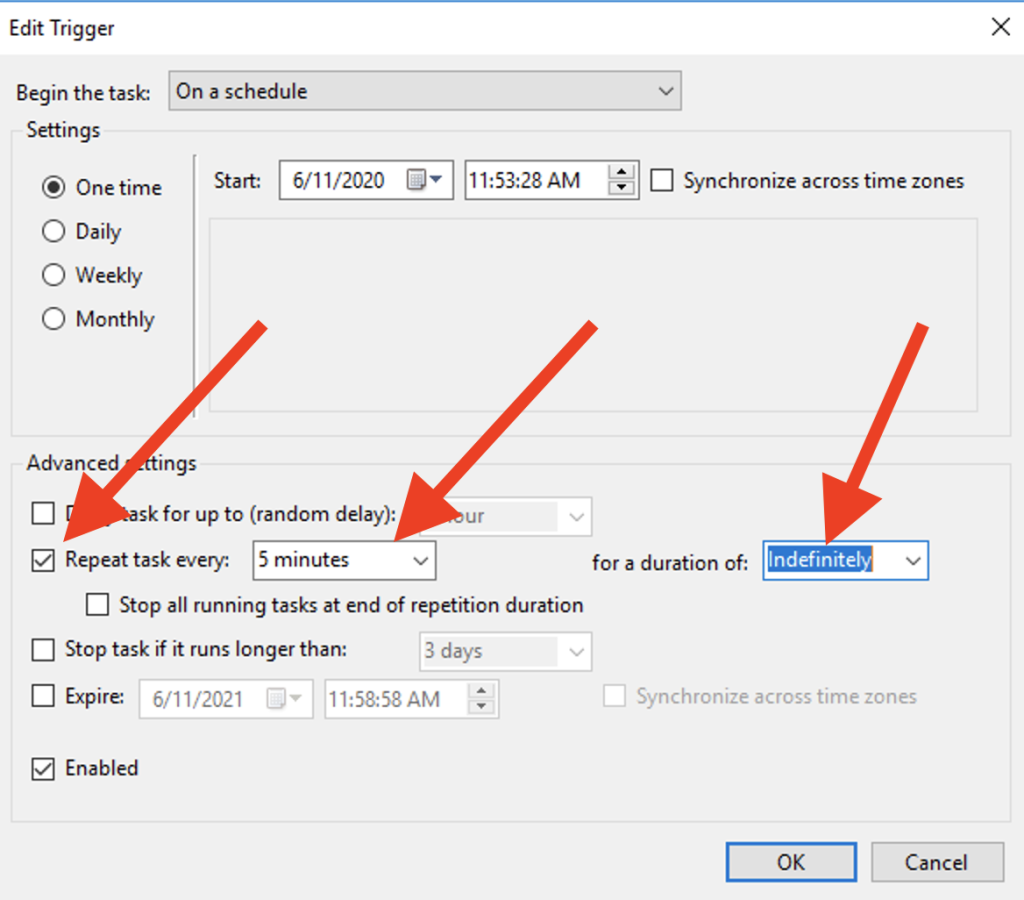
On the Triggers tab double-click the One time trigger item in the table, and set the following options to have the script run every 5 minutes:
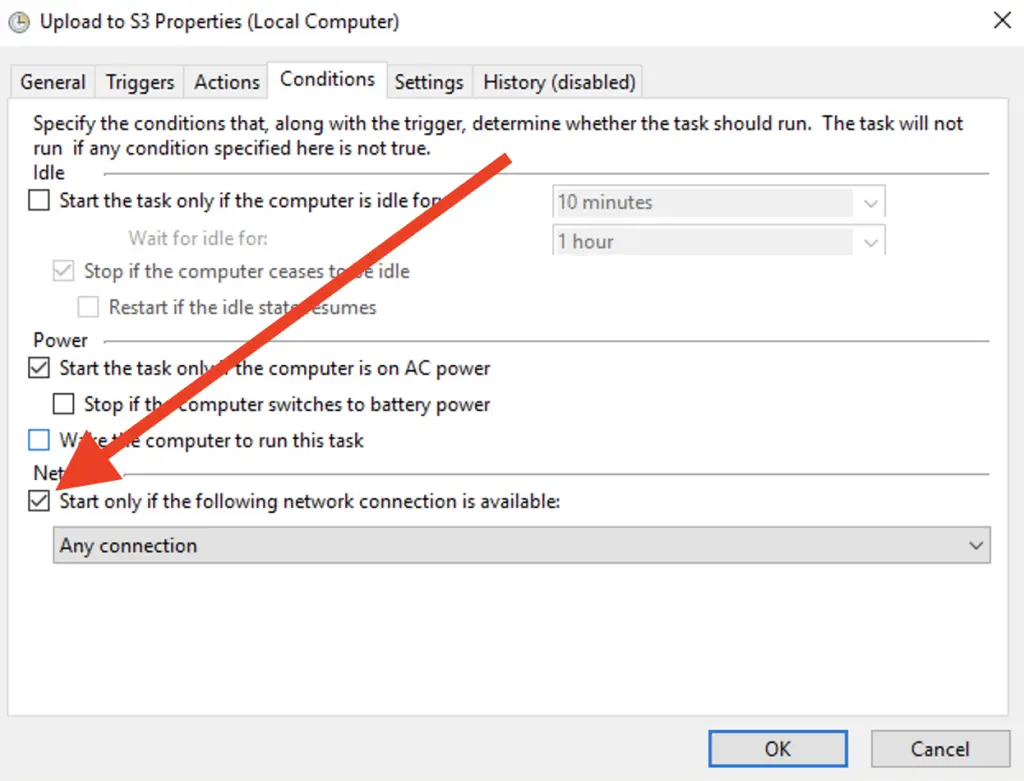
Once you’ve clicked ok, click on the Conditions tab. Here we want to make sure we’ve got a Network available to enable you to connect and upload your files:
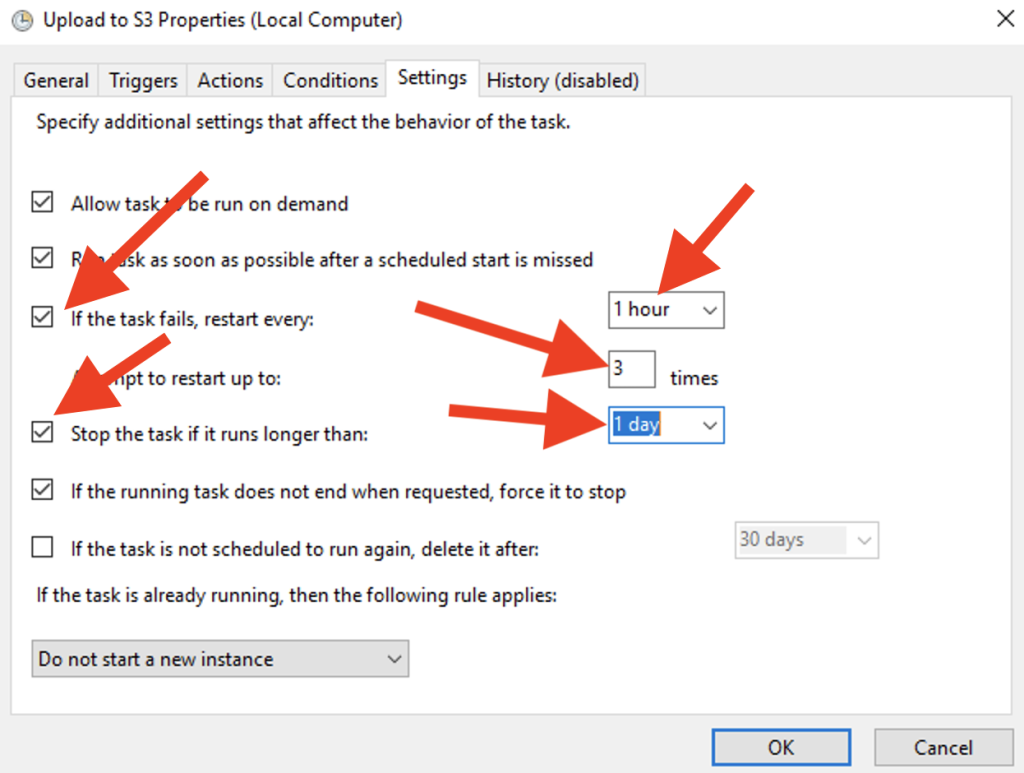
Finally, click on the Settings tab and set the following options:
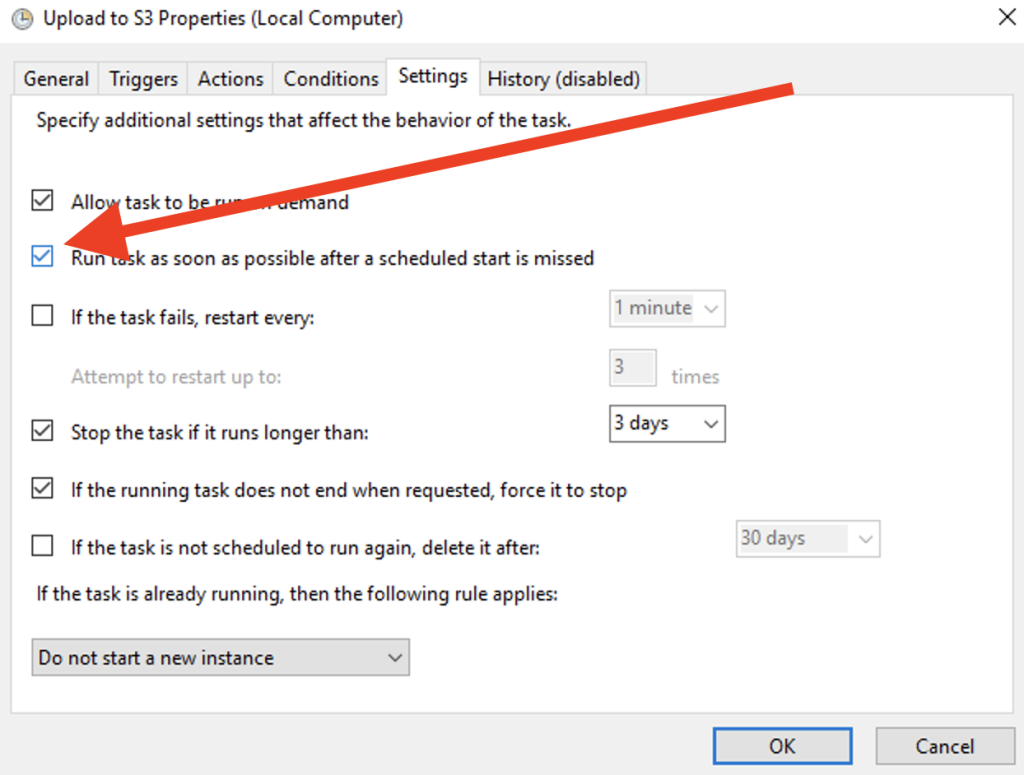
You could apply further edits to the remaining settings if you wish.
Click on OK to finish applying the property changes to your task. Enter your password to apply your changes.
To test if your task schedule works click on the Run option in the Actions pane.
Check S3 Files
Go back to your Amazon S3 account and check to see if your files have been uploaded correctly.
If you are on a Mac you can use Trasmit or CyberDuck.
Check Windows Batch File
If when you double-click on the .bat file you find the script doesn’t upload your png files to s3 then there are a couple of things we can add to our batch file to test what is wrong and then write additional code to get our script to work.
Check 1: Output Errors
To diagnose if we are getting an error with our .bat file place at the end of the file the command pause. This will leave the command prompt window open after you have run it allowing you to read any errors before the command prompt window closes down.
Therefore, using my .bat file as an example, if I wanted to check if there were any errors simply have the following:
cd C:Users/Administrator/Files
aws s3 sync . s3://your-bucket-name
pause
When you double-click on the .bat file again did you notice any errors?
Check 2: AWS Credentials
To see if our AWS credentials are working correctly we are going to add a line to our .bat file to check if it correctly uses the right credentials to access our bucket.
Edit you .bat file so that it has aws s3 ls:
aws s3 ls
cd C:/Users/Administrator/Files
aws s3 sync . s3://your-bucket-name
pause
The command aws s3 ls simply lists all the buckets available for the credentials you have entered for the user. If you don’t see anything you should double check your configuration by running aws configure in another command prompt window.
Then check there has been a bucket created in the same location you see in the command prompt window.
If you don’t see any listings, and everything is correct with your bucket reference it may also be a credential issue, go to check #4 below.
Check 3: Directory Reference
Let’s check to make sure there are files to be uploaded by inserted between the cd ... command and the aws s3 sync command a simple dir command to check the contents of the directory.
Your batch file should look something like this:
aws s3 ls
cd C:/Users/Administrator/Files
dir
aws s3 sync . s3://your-bucket-name
pause
With the batch file run you should see a listing of all the local files on your server that will be uploaded to s3. If you don’t see any files, check you have entered the correct directory address (check step 6 and 6A again).
Check 4: Set AWS Configuration
There have been issues where the batch file will not run the correct AWS credentials, this is especially true when then task scheduler runs the file.
If you are currently logged in as the user which will run the batch file you can open a command prompt window to see if the AWS configuration settings are available, simply run:
C:> type "C:Users<USERNAME>.awsconfig"
Where <USERNAME> is the user running the script, eg. Administrator. If you see a listing of the bucket location and output type like so then you’ve got the credentials defined for the user.
To explicitly set the type of user for the batch file to use, you can do so by adding the following lines:
Do you see the correct listing of your s3 buckets? And the correct contents of your files to upload?
Check 5: S3 Reference
A simple check, but one which ended up getting me, was incorrectly referencing the s3 bucket url.
Instead of entering s3://your-bucket-name I had s3:\you-bucket-name.
How do I delete files in the MQL4/Files folder?
Caution will be needed if you want to add a command to your .bat file to automatically delete the screenshots you’ve generated. However, the worst that can happen is that if you do delete a file you didn’t intend then it will be found in your Recycle Bin.
If you do want to exercise caution in deleting the files in your MQL4/Files directory then there are a couple of ways to minimise the risk of accidentally deleting files you didn’t intend:
Create another .bat script file with just the following contents:
cd C:/Users/Administrator/Files
del *.* /Q /S
RMDIR /S /Q .
/Qflag runs the deletion in quiet mode, in other words it will not prompt you for every file if you are sure you really want to delete it./Sflag deletes all sub-folders.
Then when you feel it’s time to clean up your VPS you can log in to you account and run this batch file manually.
If you want some level of automation you could create the same batch file above with the same contents, but you would schedule to run the script over the weekend. Schedule the script to perform its clean on late Sunday night (the very end of the weekend), giving you enough time to check things have been properly uploaded.
If, though, you want to live on the bleeding edge then all you need to do to your current .bat file is to append at the end the following command to delete everything once it has uploaded everything to S3:
del *.* /Q /S
RMDIR /S /Q .
Still, I would only recommend you add this command once you’ve confirmed after a few days that everything is working as it should be.
Conclusion
In this article we’ve learned how to use the AWS S3 sync command to upload a copy of our screenshots and performing this with a little footprint on our Windows VPS.
You’ve also learned how to diagnose issues that might creep up when running the script and have also learned how to clean up the folder, so it doesn’t bloat your directories.