How do you add an actionable button on the client-side view of a record in Netsuite that would allow the user, once the button is clicked, to insert something into the current record and have the changes saved to the record?
I had a recent requirement where a button was needed on the client side when viewing a record. The intent was that if the user needed to update the record the button would invoke the process for refreshing the content on the record and update any necessary fields.
The problem with viewing records is that it can be difficult to update fields without entering into edit mode.
However, there was a way I found where using a User Event Script combined with a Client Side Script helped achieve the desired result. Here is how I was able to accomplish this task.
Create User Event Script
The first thing you need to do is to create a User Event Script that is then uploaded to your Netsuite File Cabinet and attached to a Script Record and deployed to specific records where it will operate.
The User Event Script contains three entry points, but the one needed for my purpose was the beforeLoad() entry point.
This function contains one context parameter, which contains a form property which is of serverWidget.form data type.
addButton() Function
On this property is a function called addButton() which takes a sole options parameter that itself contains three properties: id, label and functionName.
The id property must start with the prefix custpage and must not contain spaces and be lowercase.
The label property is what the user will see when viewing the record. Therefore, make this value succinct and meaningful for the user to understand.
The third property functionName is the name of the function residing on the client-side script and the value of any parameters needed. For example, if the name of the function on the client-side script is myClientScript() then the value of this property would be "myClientScript()".
If the function on the client-side script requires parameters, then you would need to inject these values into the function in the order required. For example, if the client-side function requires two parameters, with the first being a string and the second being a number, then the property of functionName would look like this:
| |
Notice how I can inject the values into the function by using Javascript’s template strings. This means when the client-side script is loaded this button is primed with these parameters once the record is loaded.
The next part needed in your User Event Script is to point where the client script can be found. Two properties are available on the serverWidget.form help to point to the location of this function, and these are clientScriptModulePath and clientScriptFileId.
Location of Client Script
The clientScriptFileId property requires the internal ID of the client script file as it sits in your File Cabinet. This would mean the file would need to be uploaded to the file cabinet first and then obtaining the internal ID.
I prefer using the clientScriptModulePath as it doesn’t require uploading the file. Instead, only a relative location is needed, like SuiteScript/My Project/my_cs_custom_code.js.
User Event Script Code
Putting all this detail together would mean the User Event Script would look something like this:
Before moving on to the client script, one final point to note with the above User Event Script code is that I wrapped the code block within the beforeLoad() entry point function with a try-catch. This is to ensure that the record being viewed will not break any other user interactions that may be happening. When you do push this code into your production account you will be thankful for this small piece of code as things can still go wrong when pushing from the Sandbox environment to the Production environment.
Create Script Record
Once your User Event Script has been done you can upload it to your File Cabinet, and then you will need to register this script by creating a new Script Record.
Once you’ve registered the script deploy it to the respective records where the User Event Script will be required.
Create Client-Side Script
The next task is to create the client script. The one the User Event Script was pointing to in the clientScriptModulePath or clientScriptFileId properties.
Within this script you need to create the same function with the same quantity of parameters needed as written in the User Event Script.
In the example above, the function was named myClientScript() and contained two parameters.
Therefore, the function would be structured initially like this in the Client Script:
| |
To update fields on the current record, import the N/record module and use the .submitFields() function, which takes a sole options parameter that can update multiple fields via the values property. Therefore, the client script will contain more code as follows using the record.submitFields() function:
| |
There are ways of obtaining the type and id values without passing these as parameters to the function.
I Can’t Get ID For A Custom Record?
If you are trying to pass the internal ID of the custom record where the User Event Script is operating, be aware that if the custom record does not have Show ID ticked, you cannot obtain this value.
One remedy is to go to the custom record and tick the Show ID property:
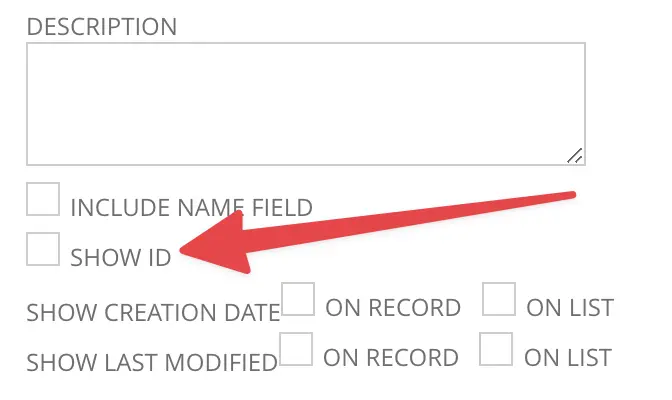
When Show ID is not ticked on a custom record the recordid value is null.
Once this is ticked the internal ID of the custom record is exposed and can be obtained using the fieldId recordid, like so:
| |
Sometimes enabling the Show ID option for a Custom Record is not ideal. If this is the case and the option remains unticked, an alternative approach is to obtain the internal ID using the currentRecord module in the client script.
N/currentRecord Module
The N/currentRecord module can help to provide some of the details needed in the record.submitFields() function.
For example, the N/currentRecord module can expose the id and type properties needed.
Here’s how you could optimise the previous client script function, including the currentRecord properties of id and type, so that these don’t need to be passed through as parameters of manually entered into your script:
| |
Now that you’ve been able to update the values of the record, how can the user see that these changes have been made?
N/url Module
To confirm the update that has happened the idea is to refresh the page to show the result.
One way of accomplishing this task is to obtain the url of the record being viewed and to refresh the browser window to this url.
Here’s how I accomplished this with the client-side script:
| |
As shown above, the remaining code fetches the url of the current record and then uses the Javascript window.location.replace() function to refresh the browser window to that url.
Here’s the final product of how the client script looks:
Update Record With Button: Summary
To invoke an update upon clicking a button when viewing a record in Netsuite, create a User Event Script that uses the context.form.addButton() function and then points to the context.form.clientScriptModulePath to the location of the Client Script.