Very similar to our previous article on how to make a header row in Google Sheets, in this article we’ll show how you can lock a column in Google Sheets.
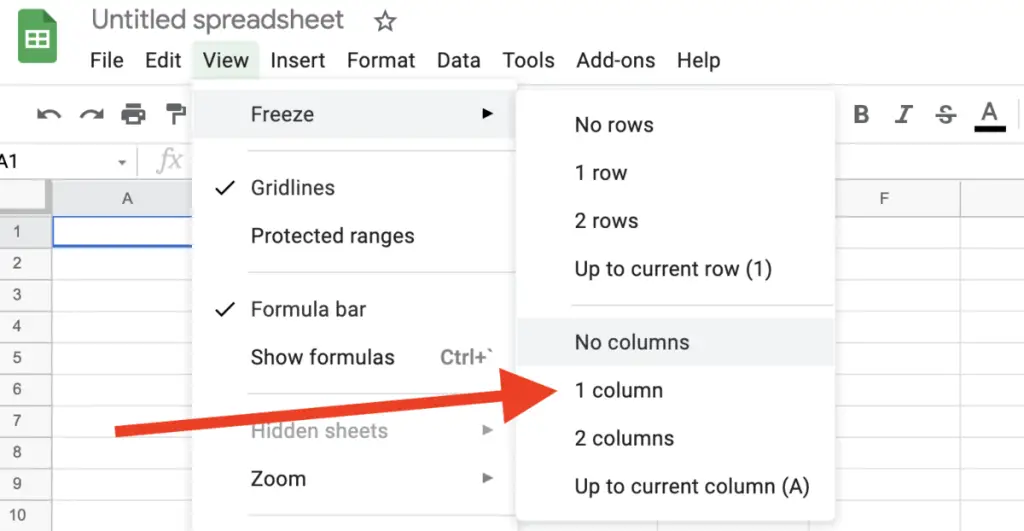
To lock a column in Google Sheets easily just navigate and click on the View menu, then on the sub-menu Freeze, then click on either of the options presented: “No column” (to remove any locked columns), “1 column” (to lock the first column), “2 columns” (to lock the first two columns), or “Up to current column” (depends on where the current active cell is located).
Alternatively you can hover your mouse over to the top-left corner of the spreadsheet, the cell containing no label and is found to the left of the column A label and above the row labelled 1, where you can see on the right side of the box a thicker line than what otherwise separates each column, as shown here:
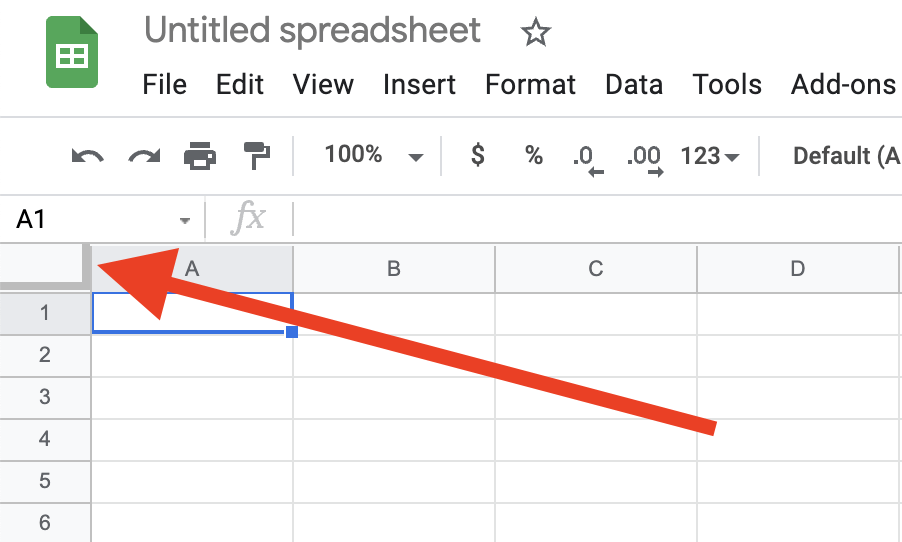
When your mouse pointer changes to a hand it means you can grab the object underneath. When you click and hold your mouse cursor and then move your mouse right you should see a vertical line which denotes what columns to the left you would like to keep frozen.
When you are done with moving the vertical line across, release your mouse button and this will now set the columns to the left of that bar as being locked.
By locking columns you can better navigate through your sheets where you have a lot of columnar data.
Locking Columns In Google Sheets For Printing
Just as we can lock columns in Google Sheets on the screen we can also use our locked columns when it comes to printing our data.
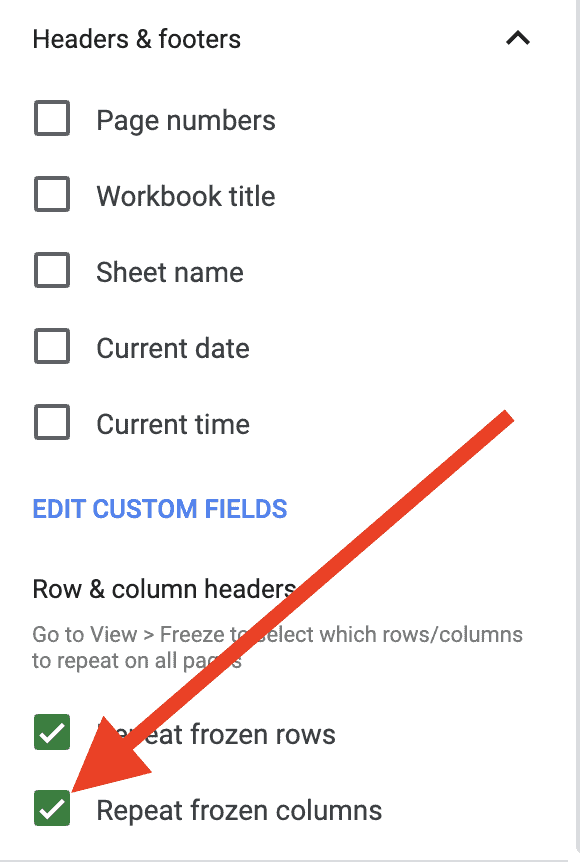
When printing our Google Sheet there is an option in the print screen under the Headers & Footers section where you have the option to print each sheet with the locked columns, just check to make sure Repeat Frozen Columns is ticked. This will allow you to see the locked columns on the left-side of each page printed.
By default if you have a locked column this option will automatically be ticked, but if this option is greyed out it’s because you haven’t set any locked columns. Do lock a column first before deciding to print your document.
Locking Too Many Columns
If you find you can’t move your spreadsheet to the right using the mouse cursor, or find your active cell disappearing off the screen, then you may have locked too many columns. If you have your active cell beyond the width of your screen (say at column R) and navigate to View > Freeze and click the option Up to current column (R) then you will notice the following prompt:
The current window is too small to properly display this sheet. Consider resizing your browser window or adjusting frozen rows and columns.
HELPFUL GOOGLE SHEETS PROMPT
By ignoring this prompt you have now effectively frozen your workspace and possibly even lost your active cell.
So how do you fix a frozen screen in Google Sheets?
How To Remove Locked Columns In Google Sheets
To remove locked columns in Google Sheets easily just navigate to the View menu, and then hover over the Freeze sub-menu and then select the option No columns.
Once you’ve selected this your frozen columns would have been removed and you can navigate back through your sheet normally again.
Summary
Locking a column helps to easily navigate through spreadsheet data in Google Sheets when the data has many columns and the first row (or two) help to provide context on the data in each column.
In this article we explored the two most popular ways to lock a column in Google Sheets, how this can cause a problem if you lock too many columns, and how to remove the column lock.
Next you might want to read our article on how to lock a row in Google Sheets.